

When your kids are cooped up inside, it’s hard to find new ways to entertain them. They’ve probably made paper airplanes before and tried to fly them but that’s boring now. Here’s a new paper flyer to try: hoop gliders.
This activity will entertain your child by having them build something, rather than just folding paper. A hoop glider takes a little more craftiness to make than a paper airplane but flies much differently. They’re fun to make and play with!
STEM Lessons
Making a hoop glider is more of an experiment than a craft. During this activity, your kid will test the four integral forces of flight: weight, lift, thrust and drag.
- Weight: How much something weighs is directly related to the force of gravity the aircraft experiences. The more gravity pulls the object back to the ground, the more forces the aircraft needs to stay flying.
- Lift: When you fold a paper airplane to create its wings, the design is trying to create lift. Pressure above and below the wing which generates lift, but how do hoop gliders create lift if they don’t have wings? The hoops on either end of the straw create the forces of lift all around the hoop. This can actually keep the aircraft in flight longer.
- Thrust: An aircraft takes flight by using thrust. It propels the aircraft through the flight as well. When you’re flying a paper flyer, you create thrust through your arm throwing it, and it immediately begins to lose thrust as it continues through the air.
- Drag: The force acting in the opposite direction of motion is called drag. Hoop gliders reduce drag because the straw of the hoop glider is an aerodynamic shape.
After building your hoop glider, you can test out different ways to create thrust at takeoff and create thrust while flying.
Supplies
- 1 drinking straw
- Construction paper, 2 4×6 index cards or card paper
- Ruler
- Scissors
- Invisible tape
Instructions
- On your paper, measure 3 strips of paper 1 inch wide and 5 inches wide. Cut the strips.
- Loop one strip of paper over itself, attaching it with a piece of tape no more than 1 inch long, making a hoop.
- Take the other two strips and tape their edges together to create one long strip.
- Loop the long strip over itself and attach it with a piece of tape to make the larger hoop.
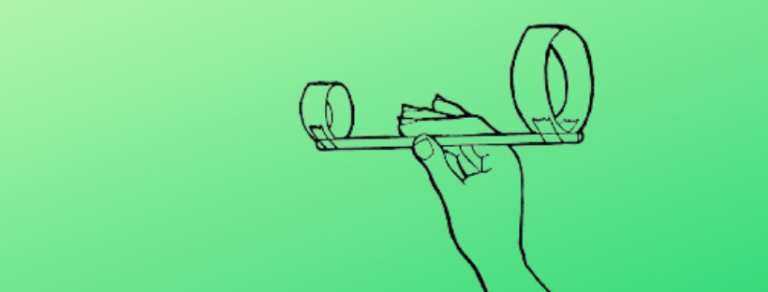
- Place the end of the straw on the inside of one hoop and place a piece of tape over it, attaching it to the hoop. Repeat this process for the second hoop, aligning the two hoops.
It’s important to keep the straw on the inside of each hoop. - It’s time to test out your hoop glider!
Test It Out
To fly your hoop glider, hold the middle of the straw with hoops upright and push it like a dart. You’ll see how the hoops stay aligned as they fly and how they work together to keep the glider flying.
Race your gliders or see which one flies farthest. Try holding it from different points on the straw to see which gives the glider the most thrust and keeps it in the air longer. You can even try throwing it while holding the very end of the straw.
This easy activity is perfect for any school-aged child. Please use age-appropriate scissors for this project and only complete this activity under adult supervision.